Percussion preset tabs
Now we're going to replace these odd percussion and preset voices. This is quite simple since these voices are mixed by resistor arrays and some resistors on the upper bus preamp board. To change the percussion tabs to second and third harmonics, follow these steps:
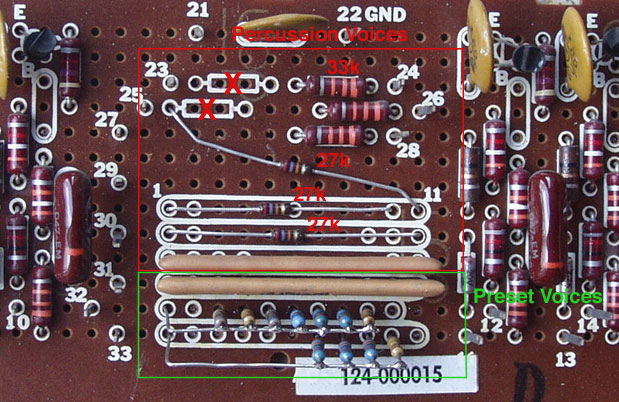
- Remove 33kOhms resistors R265 and R262 (parts marked "X" in the photo above). Refer to upper bus preamp board schematics.
- Change resistor R263 (adjacent to pin #24) from 15kOhms to 33kOhms. You may use one of the obsolete parts from the latter step.
- Remove resistor arrays 058-031178 and 058-031179 (upper two of the light brown, slim multi-pin items) completely.
- Insert 3 resistors 27 or 33 kOhms in the area outlined red as shown in the photo above.
You now have 4' fast, 4' slow, 2 2/3' fast, 2 2/3' slow on the first four percussion tabs, leaving the remaining percussion tabs unchanged. Different loudness levels can be achieved by combining both 4' or 2 2/3' percussion voices.
Drawbar preset tabs
You may want some different drawbar presets, too. Those are mixed by the lower three resistor arrays 058-031174 to 058-031176 in the area outlined green. Array -174 (bottom) is the "String" preset, -175 is "Full Tibias" and -176 is "Theatre Brass". Replace the presets you want to modify with your own resistor array. The pinout of the Hammond 058-03117x resistor arrays is as follows (Pin 1 is the leftmost one on the picture above):
|
|
|
|
|
|
|
|
|
|
|
|
|
|
|
|
|
|
|
|
|
|
|
|
Resistor values from 33kOhms (loud, drawbar level 8) up to 270kOhms (very soft, drawbar level 1) can be used. This is a matter of personal taste; I made the following replacement for the "Full Tibias" tab which resembles the "Errol Garner style":
|
|
|
|
|
|
|
|
|
|
|
|
|
|
|
|
|
|
|
|
|
|
|
|
I further replaced "Strings" by a Jazz-like "Jimmy Smith" preset. For added percussion on this preset voice, bridge the two "percussion disable" tab contacts marked blue in the tab switch diagram with a wire.
|
|
|
|
|
|
|
|
|
|
|
|
|
|
|
|
|
|
|
|
|
|
|
|
BTW: Pin 6 was used by the "Chimes" percussion voice's 1 1/4 rank only. Do not use this pin.
The lower manual preset may be changed in a similar way, despite the fact that there are only 7 drawbars. The pinout of the Hammond 058-031141 resistor array on the lower bus preamp board is as follows:
|
|
|
|
|
|
|
|
|
|
|
|
|
|
|
|
|
|
You may also change the remaining mixture percussion voices (Xylophone, Banjo) by changing their resistors, too.
Precautions
You may have to remove the solder resist laquer on the pin holes you want to use (for example with a handheld grinder) before soldering the resistor leads. It's easier to remove the complete bus preamp board from the organ to modify it. Do not confuse the wires; wire colors can be found in the upper bus preamp board schematics.
More Chorus Depth
I think the chorus depth preset is pretty weak. To get a richer chorus with more vibrato and less straight signal, replace the 12 kOhm resistor which is directly soldered to the chorus tab contacts with a 6.8 kOhm resistor (or bridge the 12 kOhm R with a 15 kOhm R). Lower values yield more vibrato, higher values emphasize the straight non-vibrato part.